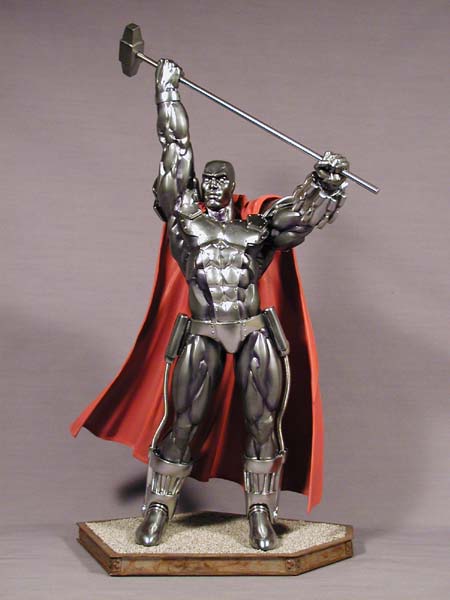
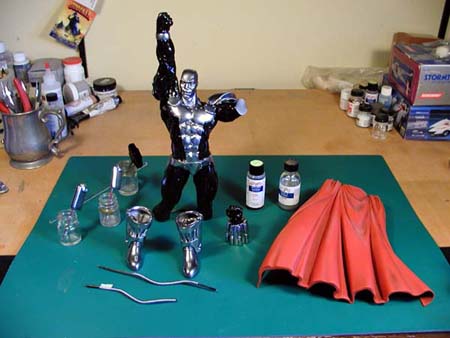
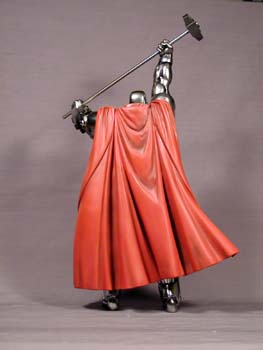
John Henry Irons, in the guise of the superhero Steel from the Superman mythos, is a character that few recognize relative to his more famous DC Comics counterparts. In all honesty, I have to count myself among the uninformed. Even so, when I saw the Horizon Originals' kit of this character, I was struck by the excellent sculpt and the reasonable price. I bought the kit on an impulse and then let it sit, untouched, in my collection for over a year. It was upon my discovery of the Alclad II lacquer metallic paints that I decided it was time to tackle building this metal man.
The descriptions that follow cover just the highlights of the project. For a more detailed explanation, look for the article The Real Steel in the spring 2004 issue of Modeler's Resource.
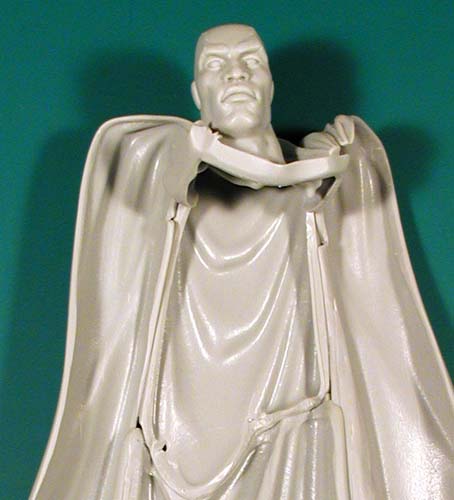
The biggest obstacle to building and painting this kit involved the cape. The four piece construction left gaps and odd contours that required filling and reshaping. In addition to this, the cape could not be attached to the kit until the end without interfering with the painting process.
Normally, this kit would have been built in subassemblies, painted, then assembled. I wasn't happy with this approach since I wanted to create a smooth metallic finish. The solution was to cut the cape away from the head, assemble, paint, and attach the cape at the end.
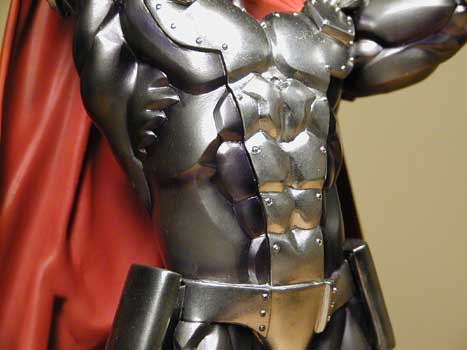
Since Alclad paints must be airbrushed, I was forced to deal with the arms separately. I had to paint the head and shoulders before attaching the arms in order to avoid interference issues. To deal with this, I primed and basecoated the subassemblies, painted the necessary metallic surfaces, attached the arms, filled the minor seams, and then reprimed and basecoated the joints. Much of this sounds like normal assembly, but it was complicated by the fact that the basecoat needed to be as smooth as possible since the Alclads would show every imperfection.
The biggest obstacle to building and painting this kit involved the cape. The four piece construction left gaps and odd contours that required filling and reshaping. In addition to this, the cape could not be attached to the kit until the end without interfering with the painting process.
Normally, this kit would have been built in subassemblies, painted, then assembled. I wasn't happy with this approach since I wanted to create a smooth metallic finish. The solution was to cut the cape away from the head, assemble, paint, and attach the cape at the end.
Since Alclad paints must be airbrushed, I was forced to deal with the arms separately. I had to paint the head and shoulders before attaching the arms in order to avoid interference issues. To deal with this, I primed and basecoated the subassemblies, painted the necessary metallic surfaces, attached the arms, filled the minor seams, and then reprimed and basecoated the joints. Much of this sounds like normal assembly, but it was complicated by the fact that the basecoat needed to be as smooth as possible since the Alclads would show every imperfection.
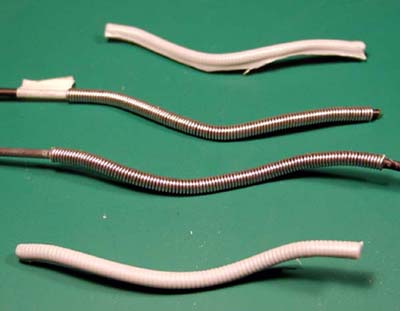
The power cables running from the boots to the powerpacks were molded onto the legs. I removed these and set about recreating them. Coat hanger wire was bent to mimic the molded forms. Thin electrical solder was then wrapped around the wire and tacked in place with CA glue. Holes were drilled into the boots and powerpacks to receive the ends of the new cables. This way I didn't have to attach them to the legs or rely on glue to hold them in place between the boots and packs.
The power cables running from the boots to the powerpacks were molded onto the legs. I removed these and set about recreating them. Coat hanger wire was bent to mimic the molded forms. Thin electrical solder was then wrapped around the wire and tacked in place with CA glue. Holes were drilled into the boots and powerpacks to receive the ends of the new cables. This way I didn't have to attach them to the legs or rely on glue to hold them in place between the boots and packs.
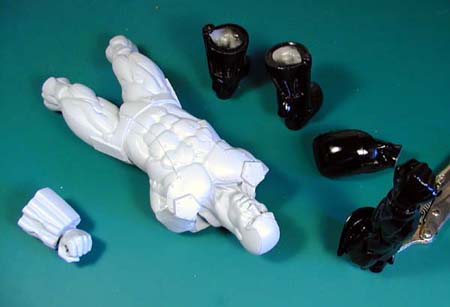
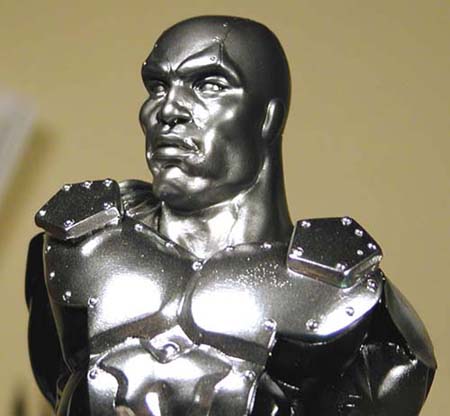
Painting the kit required some planning. First step, naturally, was to prime all of the subassemblies. Alclad high shine finishes require a gloss black basecoat while the other finishes can get by with other gloss finishes. I chose to stick to Floquil Gloss Black basecoat for both metal finishes.
With the black painted, I carefully masked off the areas that would receive the chrome finish. This paint needs to be applied at 10-15 psi in two thin coats. More coats will tend to lose some of the metal appearance and look more like paint. Once the chrome was finished and had a chance to dry, I masked around the head and neck to give it a steel finish. Like the chrome, two coats were applied. With this area painted, I could now attach the arms and deal with the seams, reprime where needed, and touch up the black basecoat before finishing the steel on the rest of the figure.
To further accent the contrast between the chrome and steel, as well as to further define the musculature, I carefully sprayed Alclad Transparent Smoke along the edges of the steel, the eye sockets, under the chin and arms, and along the muscles. I was careful to avoid spraying any of the chrome, preferring to keep it as clean as possible.
The cape received a couple of coats of Floquil SP Scarlet Red. The folds and shadows of the cape were treated with Floquil Oxide Red, while the highlights were lightly sprayed with scarlet red lightened with a bit of white.
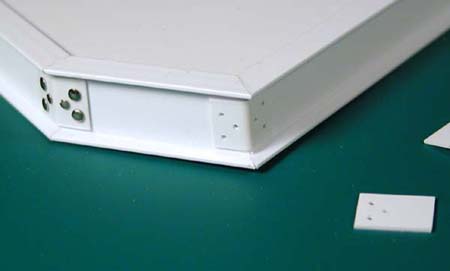
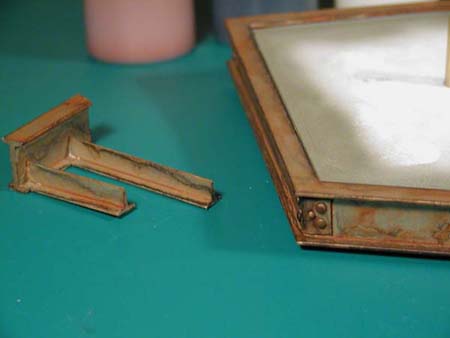
The base was intended to contrast with the clean metallic look of the figure. I wanted to maintain the constructed look, however, so I used premade structural shapes from Plastruct to build the frame. To continue the man-made look I created rivet plates for each corner using small rectangles of styrene bent and glued in place. Three holes were drilled into each half of each plate and rivets heads were created by cutting the heads off of several straight pins and glued into the predrilled holes. I didn't putty the seams since riveted structures would still show these separations. After primer, the frame was painted with Model Master Steel and then treated with a product called Rustall. Woodland Scenics Medium Grey Ballast as spread over the top surface inside the frame and glued in place per the manufacturers' instructions.
The base was intended to contrast with the clean metallic look of the figure. I wanted to maintain the constructed look, however, so I used premade structural shapes from Plastruct to build the frame. To continue the man-made look I created rivet plates for each corner using small rectangles of styrene bent and glued in place. Three holes were drilled into each half of each plate and rivets heads were created by cutting the heads off of several straight pins and glued into the predrilled holes. I didn't putty the seams since riveted structures would still show these separations. After primer, the frame was painted with Model Master Steel and then treated with a product called Rustall. Woodland Scenics Medium Grey Ballast as spread over the top surface inside the frame and glued in place per the manufacturers' instructions.