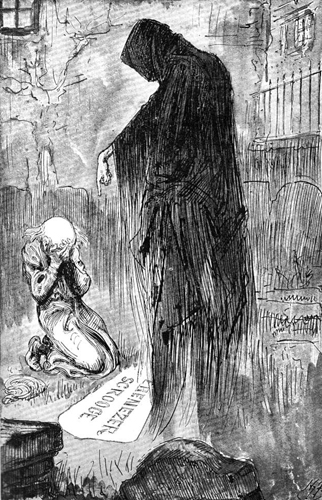
'Before I draw nearer to that stone to which you point,' said Scrooge, 'answer me one question. Are these the shadows of the things that Will be, or are they shadows of things that May be, only?'
Still the Ghost pointed downward to the grave by which it stood.
 Who isn't familiar with the classic Dickens holiday story A Christmas Carol? The timeless tale of Ebenezer Scrooge and his transformation from a greedy, grasping miser to a generous, giving soul, as portrayed by Alistair Sim in the 1951 British film, had such an impact on me as a child that it is hard to actually put into words. It has affected how I think and how I act year 'round.
A couple years ago I became aware of a planned resin kit based on this iconic piece of literature when a picture of the sculpt was posted on The Clubhouse. I knew I had to own a copy as soon as I saw the pictures of Joe Simon's incredible work. The fact that it was commissioned by Todd Powell for production by Dedham Pond only made it better. Todd, an online acquaintance, helped me out a few years earlier when I was writing an article for Modeler's Resource by lending his editing expertise in reviewing my work before submission. Naturally I contacted him early on to congratulate him on the project and to get my name on any sort of pre-order list he might have been considering. I suppose it was that contact and the previous connection that inspired a most unexpected offer.
Months went by without further word of the kit. That's not unusual for a garage kit since the producer does the work in the spare time he has between his real job, family and the many other distractions that life generates. It was in the spring of 2012 when I heard back from Todd. I was expecting an update on when the kit would become available and perhaps a projected price. No...instead Todd was contacting me to tell me that the artist who usually does build-ups for use as box art, print ads, etc. had to back out on this project and he hoped that I would consent to take on the work. I have always had strong reservations about the quality of my work (an insecurity that many modelers have expressed), but my desire for the kit and the debt I felt I owed Todd for his earlier help finally persuaded me to accept.
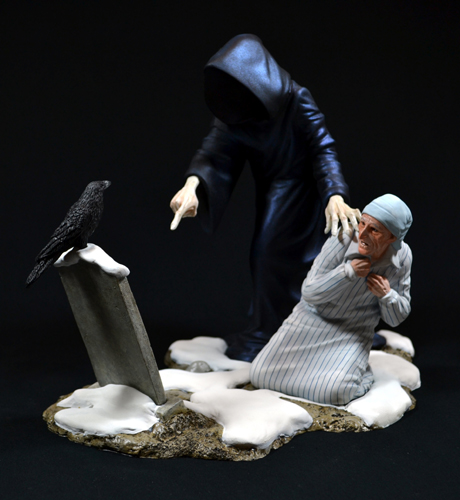
I could go into some detail on all the obstacles and delays that held up the completion of this project but, well, that would be another delay. So...here is my take on the Ghost of Christmas Yet to Come as produced by Dedham Pond.
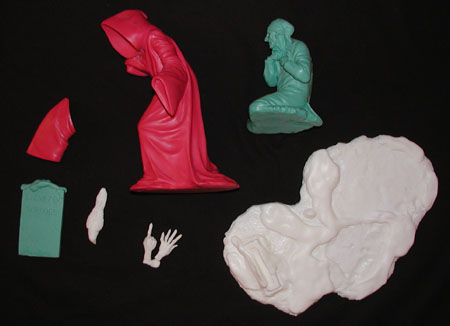


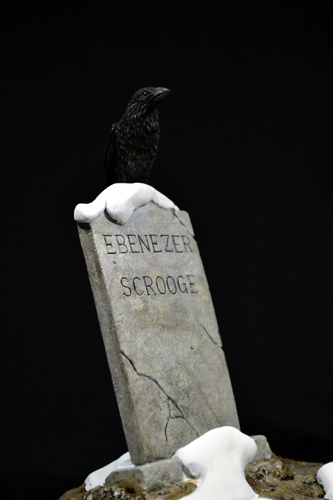
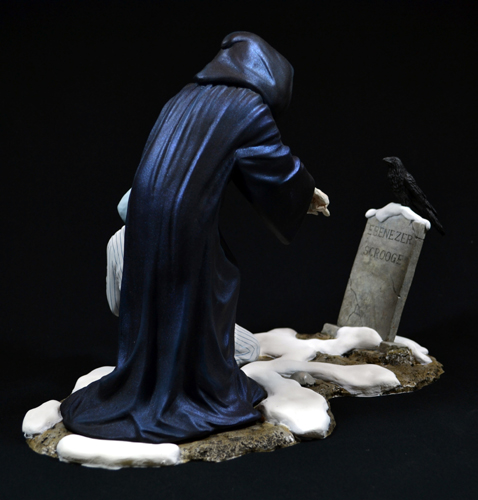
The kit came in 8 resin cast pieces in three different colors...the ghost in fuchsia, Scrooge and his tombstone in turquoise and the remaining parts in white. Todd deliberately used colored resins as a way to identify original castings from potential recast kits. Each part was cleanly cast with only minor air bubbles along the edge of the ghost's hood and Scrooge's nose and chin. Seam lines were easy to clean up due to the smooth nature of most of the surfaces...very little texture to worry about losing and having to reproduce.
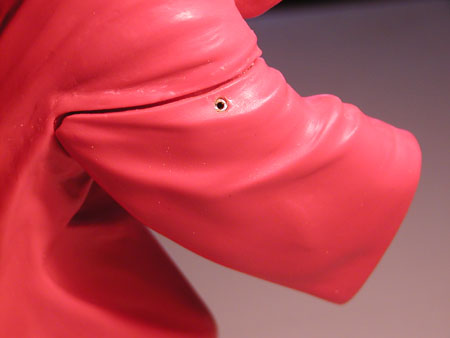
Once pinholes and general cleanup was complete it was time to consider the assembly. I wanted to have as few permanently attached parts as possible since I might have to pack and ship this kit to other locations, whether it be contests or on loan to Todd for display. A little shaving and sanding would allow the tombstone to fit nicely into the base without glue but the hands, arm and raven would be another matter. The arm HAD to be attached since there would be a visible seam otherwise. Considering the healthy key and slot design of the fit, it seemed simplest to glue the arm in place with 5 minute epoxy, drill through the arm and key and insert a brass pin. I could then putty over the end of the pin as well as fill the seam with Aves Apoxy and smooth everything afterward. For this reason I wasn't concerned about the space between the arm and shoulder when the two parts were joined.
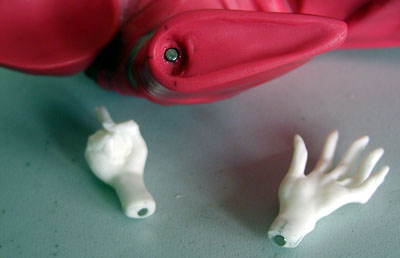
The remaining assembly points were handled differently. I could have opted to simply go with a friction fit using a pin inserted into one piece and sliding into a corresponding hole in the opposite piece. Anyone who has had to deal with such a situation knows that it would only be a matter of time before the fit became loose and would not longer be able to hold the parts.
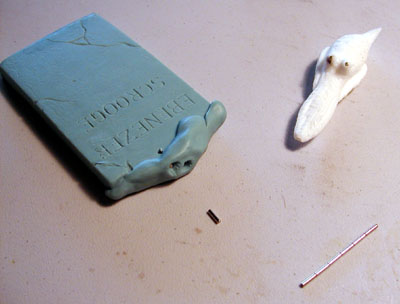
The solution I chose was to use magnets to attach the ghosts hands and to hold the raven on top of the tombstone. Two different diameters of magnet were used: 1/16" for the raven and 1/8" for the ghosts hands. One magnet was placed in each hand and a corresponding magnet was placed in each arm. Using an idea from a friend I made sure that the polarity of each hand was reversed from the other so that only the correct hand could be placed on the respective arm. Similarly, two magnets were placed in the ravens legs and matching magnets were placed in the top of the tombstone. At one point I made the mistake of placing one magnet in the tombstone incorrectly, getting the polarity reversed compared to the raven. It was necessary to drill a hole through the tombstone beneath the magnet so that I could force it out and reinsert it correctly.
Regarding magnets, perhaps a few words should be said. There are several types of magnets, but for their relative strength neodymium magnets are probably the best possible choice for hobby work of this nature. These magnets can be found as N42 or N52 grade with the higher number being the stronger of the two. The magnets I used are quite small but caution should be used with larger versions. In larger diameters the magnetic force can become strong enough that, should they slam together uncontrolled, the magnets can shatter or break a finger trapped between them.
It's become common to use a wide range of techniques in painting kits. This was no exception. I won't go into too much detail on much of what I did but I will give the highlights of each section.
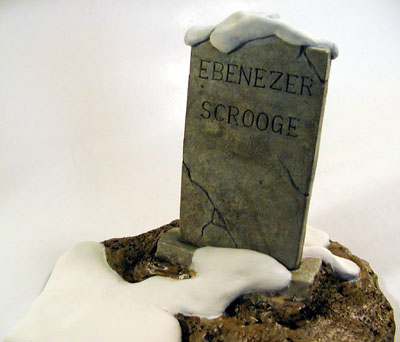
The tombstone and the exposed ground used similar techniques. Starting with a medium gray primer I randomly sponged on two or three differing colors focusing mostly on browns but including some reds and greens with in the tone variation. At that point it was important for the colors to be a bit exaggerated since later washes and/or glazes would help mute the effect. Also, I felt it important to do all the sponging in one rather rapid session. I didn't want the stippled colors to have much chance to dry before the next color was applied since I WANTED them to mingle a bit. Once a nice random pattern had been achieved I applied a thick glaze of a black/brown tone over the ground and a thinned version of it washed over the tombstone. Letting it sit only long enough to cover about 10 square inches, I wiped/daubed off the excess and set it aside.
Masking around the edge of the ground and the base of the tombstone I sprayed several coats of a flat white for the snow areas. Since this was going over a gray primer I didn't worry much about shading. Instead I simply applied either fewer of more coats in given areas, letting the underlying gray "tint" the white for a subtle shading.
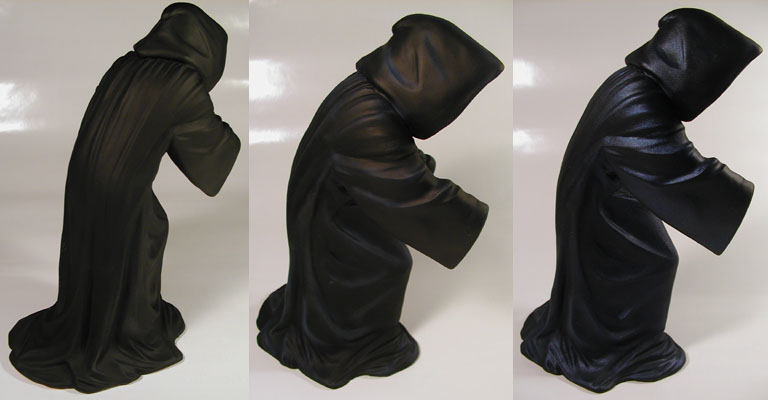
I felt I had to veer from the description of the ghost as Dickens put forth. To go with the straight black look from the story, I felt, would be problematic for photography and would lack some visual interest. Even so, I wanted to remain as faithful as possible while giving Todd an interesting subject for his art work. To this end I started by priming with a medium gray and basecoating the ghost with a flat black. Next, I sprayed a medium light blue over the tops of the folds in the cloak as well as obvious highlight areas. Lastly, I lightly oversprayed the figure with a blue flip-flop paint to try to give the cloak a bit more of an ethereal appearance.
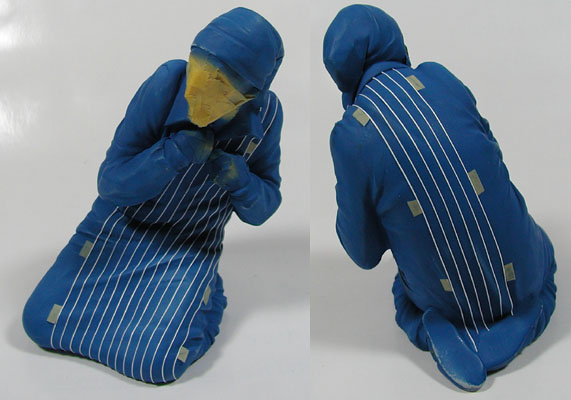
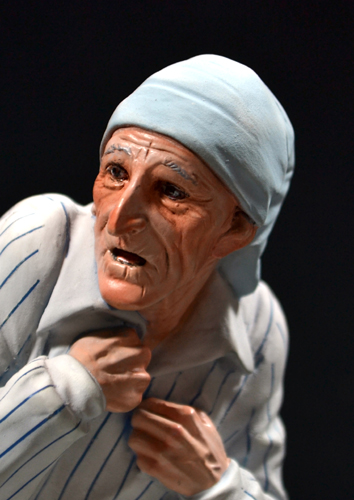
I knew that painting Scrooge would be the most important and most difficult part of this project. With the ghost in a solid color, I decided early on that Scrooge needed some sort of pattern to his nightgown. Whether that would be contrasting colors between the body and the trim or literally a pattern ultimately was determined by looking at images of vintage outfits from the Victorian era. Plus, doing stripes was something I had never done and the idea intrigued me despite the challenge it presented.
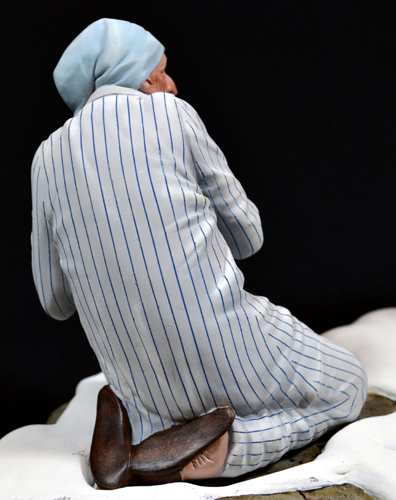
I decided to use a very light gray for the color of Scrooge's gown so that it would stand out against the stark white snow and still look essentially white. I started by priming in the same medium gray that I had used elsewhere on the kit. Over this I applied the light gray I had mixed up for his nightshirt. I experimented with the idea of drawing the pinstripes using a fine colored pencil and a tape strip as a straight edge, but the various folds and hunched posture made this unworkable. On to the next method.
I went back and re-basecoated him in a medium blue. This time I applied 1/64" graphics tape over the blue to mask off what would become the pinstripes. I started at roughly the centerline of the front and the back of the gown and spaced the neighboring stripes using small bits of 1/8" masking tape. I penciled in faint lines along the tops of the shoulders, where the sleeves would meet the body of the gown and down the sides where the front and back panels would meet. These lines would act at cutoff points for the stripes. After several evenings of carefully placing (and re-placing) tape stripes I finally had a pattern that looked satisfactory. Over this I sprayed the same light gray that I had tried on my first effort. Naturally it took several coats to get good coverage...which actually helped in that I could let the deeper parts remain a bit darker and thus look shaded. Once I was happy with the coverage I took a stark white and lightly built up highlights along the shoulders, thighs and any raised ridges in the folds to help accentuate the fabric. Lastly, the cap needed to be painted but I didn't want the duplicate the stripes partly because of the tedious nature of the striping and partly to get a bit more variation in Scrooge's attire. I used a vastly lightened version of the medium blue of the stripes and sprayed the cap.
Then came the moment of truth. Did I get good adhesion of the stripe tape? Did I get all the tape tucked into the folds properly before I painted a given area? Would the tape lift the underlying paint and ruin the effect? Would the paint colors look anything like what I had in my head or would it look garish? You be the judge.