Is there anyone who hasn't seen the classic Universal Studios monster movies of the '30s and '40s? Everyone has their favorite...from the adaptations of literary classics like Dracula, Frankenstein, and The Invisible Man to original stories such as The Mummy. This period culminated in The Wolf Man from 1941. While there is one other Universal Studios creature that I like better--namely, The Creature from the Black Lagoon--Lon Chaney Jr.'s rendition of The Wolf Man has got to be my favorite from this golden age of monsters.
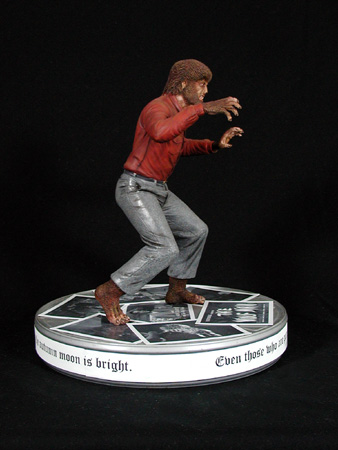
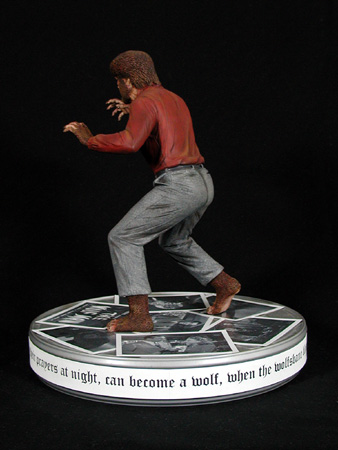
"Even those who are pure at heart, and say their prayers at night, can become a wolf, when the wolfsbane blooms and the autumn moon is bright."
In the early '90s Horizon Models released 4 classic monster kits, marking what might be considered the golden age of vinyl figure kits. Prior to this time the vinyl kits on the market suffered from less than ideal proportions, spotty likenesses, and fairly static poses. With the arrival of The Incredible Hulk kit in 1990 the bar began to climb. By 1993 The Wolfman had arrived along with The Mummy, Frankenstein's Monster and the Creature from the Black Lagoon, rounding out the quartet of classic monsters.
Work on this kit was fairly straightforward. I knew I wanted to anchor the kit to a film canister base so a hole was drilled into the sole of the left foot and a #8 screw as inserted. The foot was then packed with a 2-part epoxy putty that would securely hold the screw in place and stiffen the foot to support the kit once the putty had hardened. I've used this method several times with great success in the past for kits that I wanted to be removable from their displays. At this point the legs could be filled with plaster or foam to help resist the tendancy that vinyl kits have of slowly sagging due to heat over time. I confess that I am prone to skipping this step on many kits and have regretted it on a couple of occasions.
The kit is composed of 8 vinyl parts: right and left arms, right and left hands, torso with head, lower body with right leg, lower left leg with foot, and right foot. I assembled the upper and lower body, arms, and lower leg as one subassembly leaving the hands and foot separate to making painting a bit easier. It would have been nice if the head had also been separate but we can't have everything, can we?

As has been typical of Horizon vinyl kits, the parts fit was generally very good. Even so, a little judicious use of heat to soften the parts before assembly helped coax the parts into the best possible fit. A little epoxy putty followed by sandpaper and riffler files hid the seams nicely.
Even though I've been building models for 40 years and figure kits for the last 10 years I still get intimidated by the painting stage of any project. It is, in fact, one of the main reasons it's taken me so long to try and tackle these classic monster kits. I've tried many different paints and several different techniques over that time. As of late I've started to finally settle on a few preferred materials...though that will hardly keep me from continuing to try new things to bring my skills above mediocre.
I've come to favor artist acrylics, specifically Liquitex heavy body tube paints, for my color choices with Model Master Acryl primer for the base. Liquitex paints give you an almost infinite color pallet with all the mixing possibilities before you. The one problem I've run into is the fragility of the paint. After trying several different primers I settled on the Acryl primer as the only one that provided a strong bond with the Liquitex paints while they were still 'green'. I know many who use the artist acrylics like to use the pre-thinned soft body paints but I still lean toward the thicker tube paints since I can still thin them for spraying by using the Airbrush Medium the manufacturer makes for just such cases. Also, I find the cost better considering how far one tube of paint can go.
Color choice was one of the stumbling blocks for me with this kit. The movie was filmed in glorious black & white...which does nothing to help you figure out what the original colors had been. Traditionally the Wolfman has been portrayed in a green shirt with dark trousers. I could have gone that way, and almost did, but it seemed a bit too common. Also, after viewing the film, I realized that the contrast between the shirt and trousers varied quiet a bit from one scene to the next. That gave me, in my own mind anyway, the latitude to do something other. I'd seen a build up of another Wolfman kit where the artist had chosen a red shirt that I liked a lot. So, red shirt it would be. The trousers wouldn't have been heavy denim considering the upper class standing of Larry Talbot, far more likely a wool or tweed material.
Painting the shirt was fairly straightforward, so little explanation is needed. The base color is a red oxide with shadows airbrushed first with a darkened version of the base color (darkened by adding the complimentary green), then deepened in select areas with transparent smoke. Highlights were sprayed using the base color lightened with a bit of yellow ochre. Details such as buttons were painted a darker red.
The trousers were a different matter. I knew I wanted to give the impression of wool but I didn't have an easy way to spray a fine speckled pattern to simulate the splotchiness of wool or tweed. After much thought I decided to try to stipple it on using an old toothbrush.
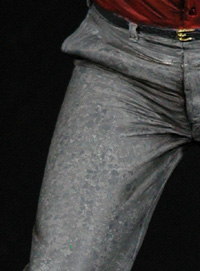
I started with a base of a medium grey. I could have simply used the primer as the base color but I had sprayed that some time earlier and I wanted the base color a bit 'green' so that the stippled paint would have a bit more bite into the substrate. For the stippling I mixed up several variations of the base grey, both lighter and darker shades, deliberately adding some slight hints of red or purple on a couple of the colors. Lightly tapping the bristles of the toothbrush in one color, I removed much of the paint just as you would do when drybrushing, then tapped the brush on the model. Once I had a fairly even pattern across the trousers I repeated the process with another shade, not worrying about cleaning the brush between shades. Shifting back and forth between lighter and darker shades (sometimes repeating a previously used shade) I slowly built up the pattern. At that point the pattern was a bit strong, as I expected it probably would be. To knock this back a bit I thinned some of the base color and lightly misted it over the trousers to tone things down and blend the shades together. Shadowing was handled by airbrushing transparent smoke into the recesses. In the end I think the speckle pattern is a little large, but overall I'm satisfied with the effect.
The hair and fleshtones were simple and much like other builds I have done previously. I started with a medium caucasian flesh color that I had left over from another kit. This was applied over the head, feet, and hands. The hair was then blocked in with a raw umber and given a heavy wash of a raw umber/black mix. The highlights were then drybrushed with successive lighter tones ranging from burnt sienna through yellow ochre. The same technique was used when I painted the fur on the Wooly Mammoth. Once the hair was essentially done I returned to the skin, using pastels to add all the shading. Once this step was sealed with flat laquer any final touchup details were completed.
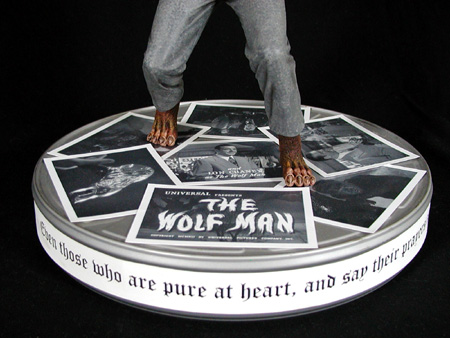
The base, as mentioned earlier, was made from a film canister. I wanted to continue the nod to Hollywood theme that I had started with the filmstrip base I made for the Mummy, but I didn't want to simply copy an idea I had already used. I wanted to decorate the can with something appropriate to the movie. I had considered a backdrop image as if he were stepping out of the moviescreen. I had also looked into the idea of recreating a page of the script or the text of the poem curling up from beneath his feet, possibly with a sprig of Wolfbane and a cane handle like the one from the movie. Both ideas fell through for various reasons. What I finally settled on was to create "photographs",like small lobby cards, spread out under his feet and the poem wrapped around the edge of the can. The images were taken directly from the movie as screen captures on my computer, cleaned up in Photoshop, and printed on photo-grade paper. The end effect wasn't nearly as interesting as what I had originally wanted.