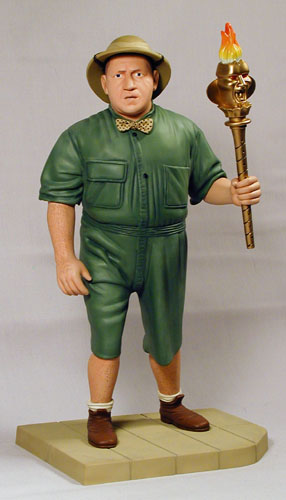
Curly is one of three kits of the Three Stooges by Polar Lights designed to link together or stand alone.
A fairly simple kit to assemble, the most notable problem in re-scribing the recessed hair pattern in the arms and legs once the two halves are assembled.
Consisting of 29 pieces, including the base, the assembly is straightforward. I started by putting together the arms, legs, and head so that I could paint and detail the sub-assemblies.
This was only the second time I had to reproduce natural skin tones (the first time was just prior to this kit with the Lt. Worf figure). I have always preferred subtle, blended colors since it yields more realistic results. With this in mind, I chose to work with two Testors Model Master enamel skin tones: Skin Tone Tint Base-Light and Warm Tone. The base coat was a 50/50 mix of the two colors. Shadows were blended in with straight Warm Tone rather than washed. Straight Tint Base-Light was drybrushed/blended in to catch the highlights and smooth the transition between shades. Adding a bit of red and white to the base color gave the lip coloring. Radome Tan (kind of an Antique White) was used for the eyes and teeth, and socks.
The shoes were assembled and painted as their own sub-assembly. Leather Brown was used as the base coat. This color was then darkened with Black into almost a Chocolate Brown and used to accent the folds and shadows. Again, I did not wash this, but rather, drybrushed and blended it in. From here the shoes could be attached to the legs.
The body is a two piece shell and each sleeve, likewise, is made of two pieces. The sleeves must be assembled and are then captured between the body halves along with the head in order to assemble the body. This required masking the head before painting. An acrylic Lichtgrun RLM 83 (German light green) was used for the base coat. A darker tone was then washed over areas to show off the folds (I did not like the harsh edges the wash gave--I guess that's why I don't like using washes). A lighter tone finally was drybrushed onto the highlights. To blend the whole thing the lighter color was then misted with an airbrush from above.
A U.S. Marine Desert Sand color and variations of it were used for the Pith Helmet, bow tie, and base. The polka dots were applied with the end of a paper clip dipped in a dark brown.
The last major component was the torch. This just begged to be a metallic. My favorite for golden tones are the Floquil railroad colors--very fine grained and beautiful tones. The one thing to keep in mind is that Floquil paints contain very "hot"--reactive--solvents. They can easily ruin previous paint layers or even the plastic if applied too heavily without a barrier coat. Since I planned to airbrush them for a smooth finish I could make sure they went on in thin--read safe--coats. After the base Gold coat a Floquil Graphite color was used for the spiral and dimples on the handle. The eyes were given a coat of Floquil Scarlet.
Lastly, the flame was painted first with Flat White acrylic. A Yellow acrylic was the then airbrushed on at a low, oblique angle. This was followed with Orange acrylic in the same way as the yellow, concentrating on the top and carefully filling the upper recesses. A misting of orange was then applied to the transition of the yellow to orange to moderate the color change.