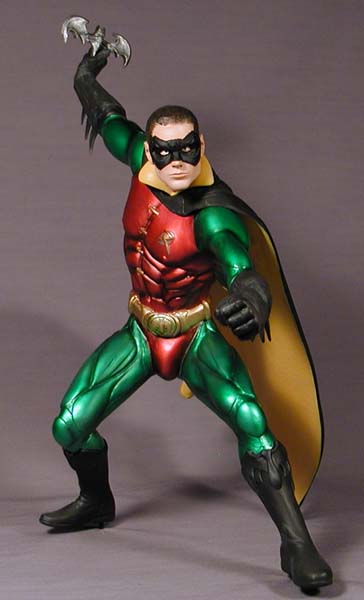
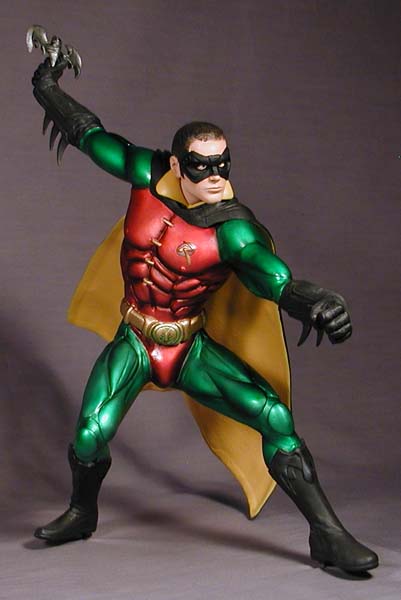
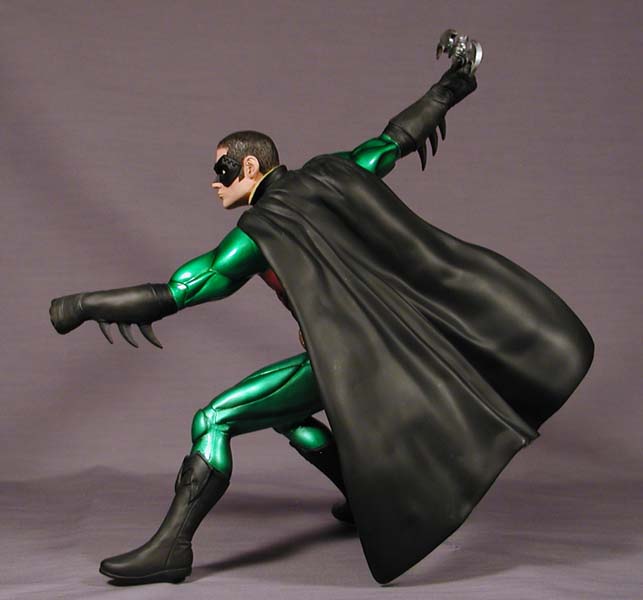

Robin--Batman's sidekick and protege--as depicted in the movie Batman Forever, was a kit that intrigued me since I first became interested in figure kits. The metallic color scheme offered a new challenge. When it came time to select the subjects for my entry for the When Two Worlds Collide II contest, I knew this was one of the kits I wanted to build. Faced off with the Crouching Spiderman, they would make for a very dynamic scene--especially when placed vertically on a wall for their faceoff. Of course, this meant that some alterations would have to be made to the figure.
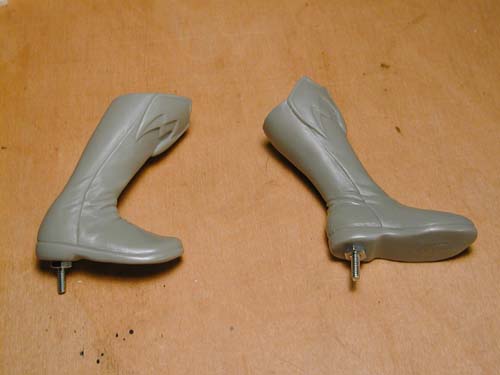
Just as had been done previously with the Spiderman figure, screws had to be installed into the boots of the kit in order to attach the finished figure to the display wall. The same procedure was used here as with Spidey. Holes were drilled in the heels of the boots. A thread with a loop was passed through the bottom and tightened around the screw threading. Then, with the help of a riffler file, the screws were pulled/pushed through the holes and epoxy putty packed in behind the screw head to help hold them in place.
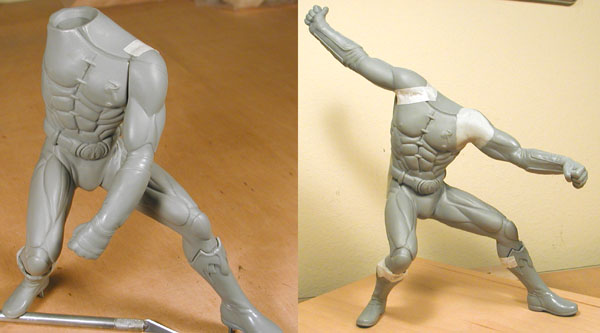
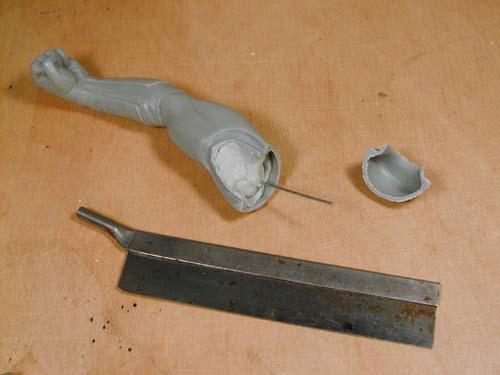
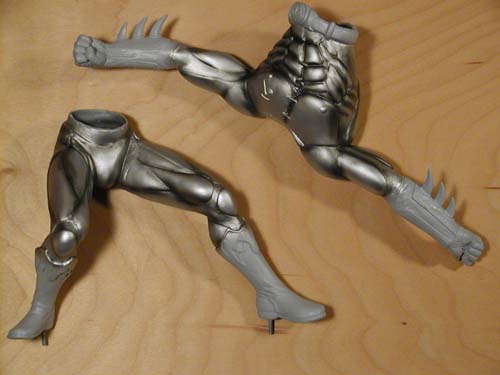
Since the concept for the diorama was to have Robin meet Spiderman on the side of a building during a Batrope climb it was obvious something had to be done about his left arm. Out of the box, Robin's left arm was pointing down between his knees...certainly no way to support yourself from a rope on a vertical surface! I needed to extend the arm outward so that it would look like he might be hanging from one arm while preparing to throw with the other. Never having modified a figure kit before, the idea of cutting up and resculpting the shoulder was daunting to say the least--frightening is more like it. After looking at the arm and torso for more time than I care to admit, I finally decided it was best to cut off the top half of the shoulder and much of the flange that would have held the piece in place so that there would be no direct contact between the arm and torso. After the vinyl was cut I inserted a paper clip into a wad of epoxy putty and stuck it into the butchered arm. I chose a thin wire because I wanted something that could be easily bent and positioned after it was fixed to the torso.
Once I had the piece mounted and positioned to my liking, it was time to start building up the shoulder and blending the contours together. Rather than working with one large blob of putty and possibly having it harden before I was happy with the results I decided to build up the shoulder bit by bit. Once I finally had sufficient muscle mass built up and the contours close to what I thought they should be I set it aside to fully set up. Once hardened I used a set of riffler files to cut in the final details and a couple grades of sandpaper to smooth the work and feather the edges into the rest of the figure. Pictured below is the figure before and after surgery but before the final layer of putty and contouring was completed.
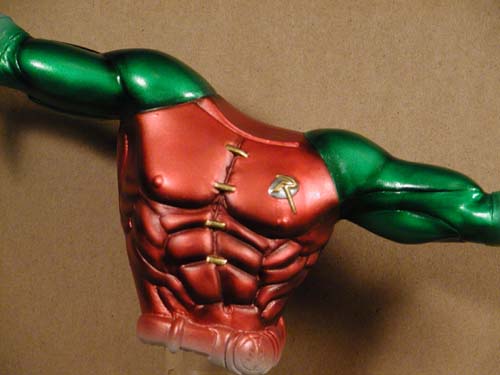
I knew I wanted to use transparent paints for the red an green of Robin's costume, but I wasn't exactly sure how I was going to create the metallic look. Since I planned on using Tamiya clear colors I decided to stick to their metallics as well...just in case I needed to mix paints. The method I finally decided to try was painting a base coat of X-11 Chrome Silver over the acrylic primer. Onto this I airbrushed X-10 Gun Metal into all of the recesses and shadowed areas. The hope here was that I could achieve all of the shading this way rather than trying to shade with the clear colors. I applied the Gun Metal heavier than I would normally since I expected the color coats to mute the shading to some degree.
Once the metallic base was finished I masked the arms along the division lines and sprayed X-27 Clear Red over the torso in several light coats so that I could more easily control the evenness of the coat and the depth of color. After removing the masking I let it sit for a while and masked carefully along the edge of the red to paint the arms. X-25 Clear Green was used for the arms and legs and applied in the same manner as the red. If the clear colors are allowed to cure for about 24 hours before applying masking over them the adhesion is very good, but if you try doing this too soon (as I did my first time out) the tape can lift the clear color off of the metallic undercoat.
All of the silver and gold were brush painted using Floquil Bright Sliver and Floquil Gold. I known the backing oval on Robin's logo should be green but I wasn't about the try masking that small area and brush painting clears don't look like the airbrushed results...so I left it silver.
The cape, boots, and gloves were painted with a 50/50 mix of Model Master Acryl Flat Black and Panzer Schokoladenbraun with a little drybrushing of Gull Grey. The inside of the cape is painted with Model Master Acryl Gelb RLM 04. Robin's hair was basecoated with the same 50/50 mix I used for the leather and then drybrushed first with straight Panzer Schokoladenbraun and then with Burnt Sienna. All of the flesh tones were painted with Model Master Enamel skin tones--basecoated with a 60/40 mix of Warm Tint and Tint Base Light. Over this I worked in Shadow Tint and straight Tint Base Light for the shadows and highlights. I like using enamels for the flesh tones because the longer drying time allows me to blend the colors more easily.
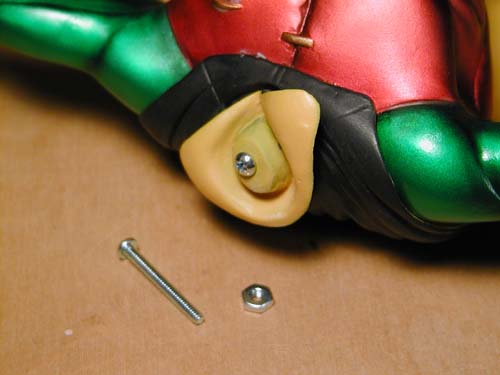
Attaching the cape was a trial. With the resculpted shoulder the cape had to be heated and held in place so that the new contour would set up. Unfortunately there was very little actual contact area between the cape and the upper body after the alterations. CA glue wasn't able to hold with the only real contact being along the front edge below the collar. To remedy this problem I drilled a hole through the collar, cape, and top of the torso and bolted it together with a 1" screw for added support. After a little touch up painting to the clear red where the cape separated, I was able to attach the head and glue the Boy Wonder together at the waist.
I hope you like the results!